Introduction
Overview of Solar System Activation Process
Turning on a solar system involves a few essential steps to ensure proper operation and safety. After the installation of solar panels and necessary components, the system needs to be inspected and approved by the local authorities before being turned on. Once the approval is obtained, the system is connected to the utility grid and commissioned to start generating electricity. The system’s performance is then monitored to ensure that it is functioning optimally and efficiently. The monitoring data is analyzed regularly to identify any issues that may arise, and the system can be adjusted or serviced as needed. Finally, the solar system owner can enjoy the benefits of renewable energy, including reduced energy bills and environmental impact.
Interconnection Process
A. Connecting the solar system to the electrical grid
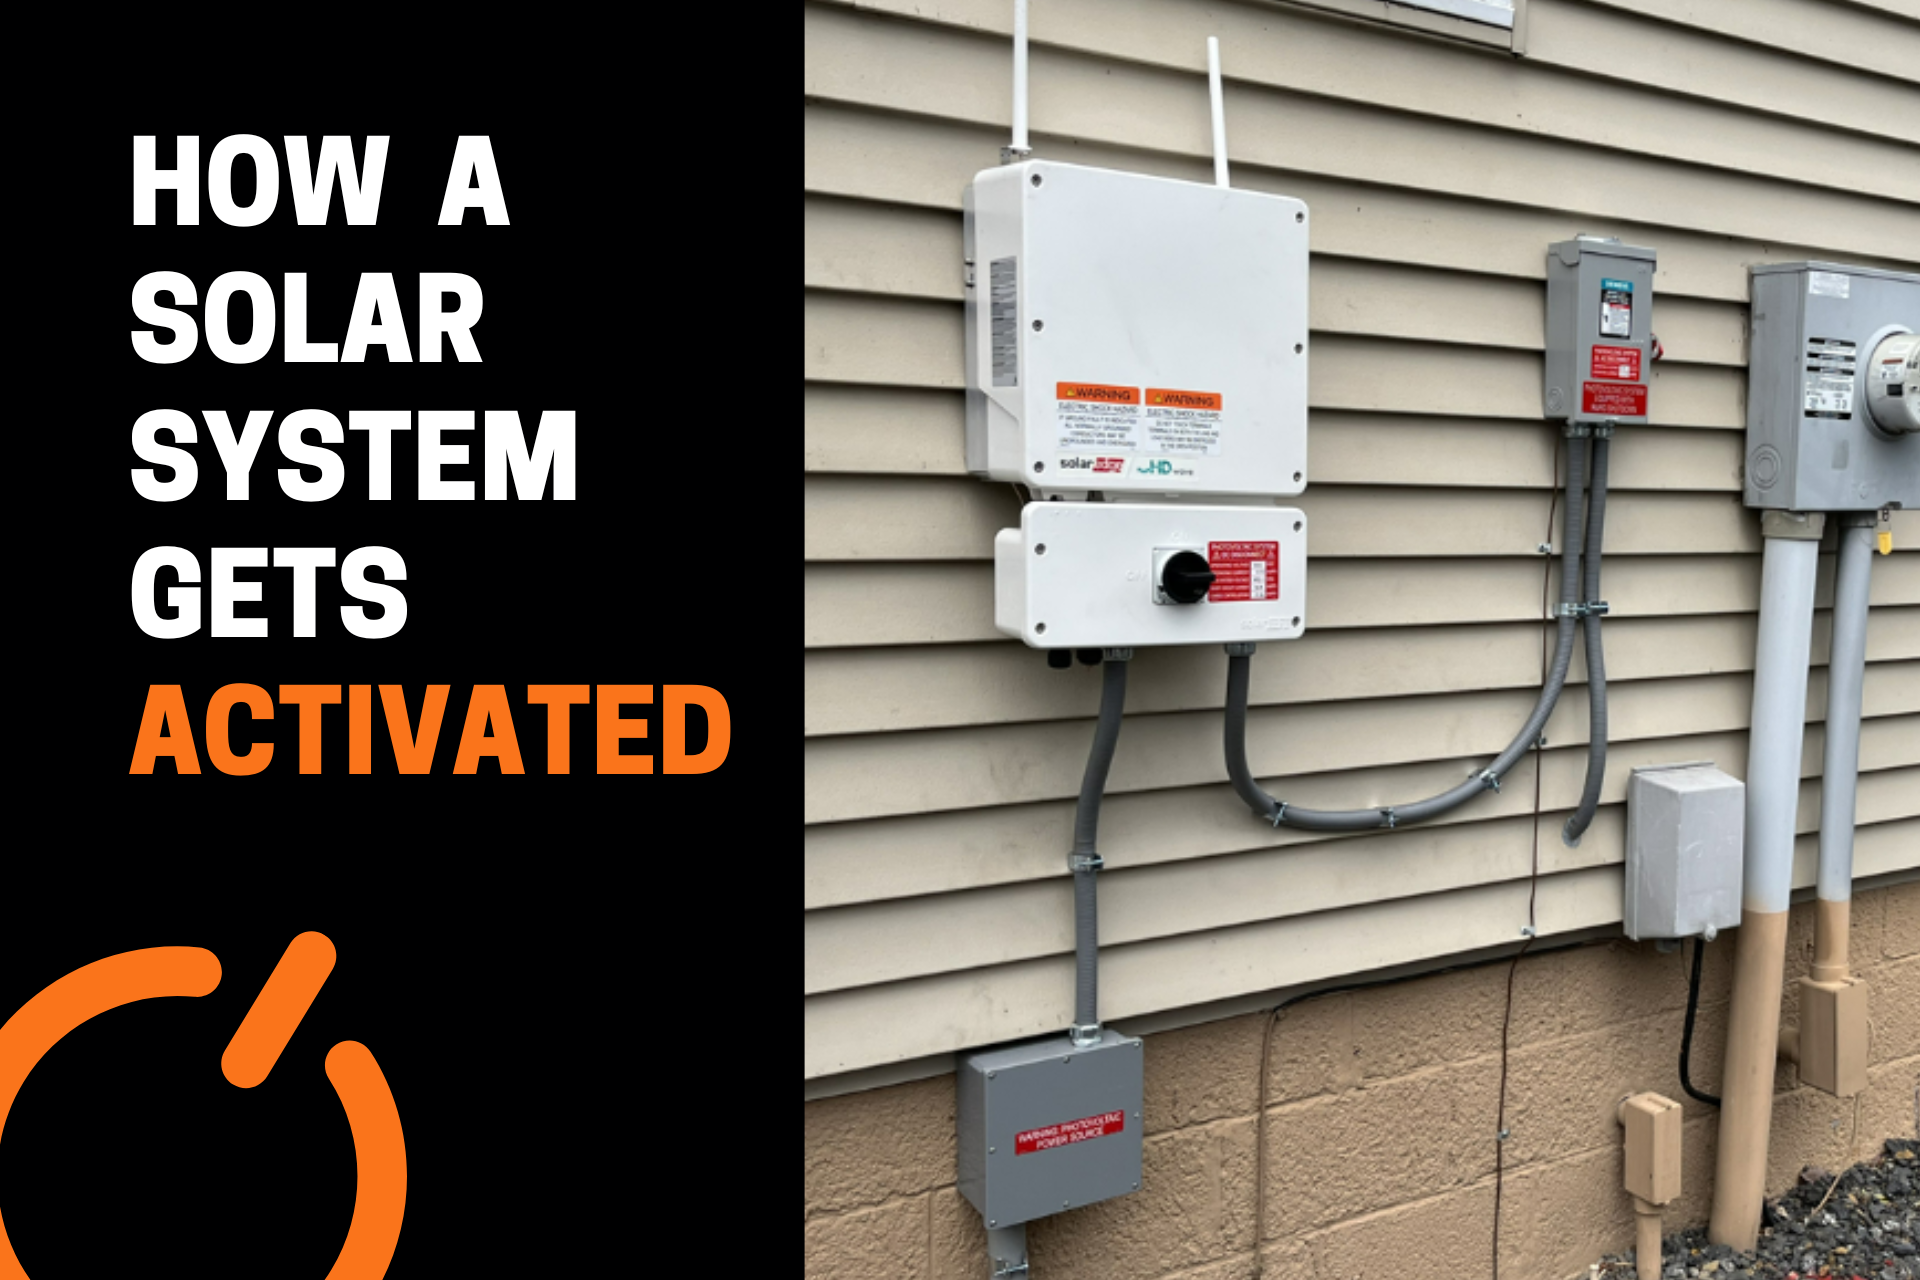
Connecting a solar system to the electrical grid involves several steps to ensure it is done safely and correctly.
- The first step is to obtain permission from the local utility company to interconnect the solar system to the grid. This involves submitting an application and ensuring the system meets all the requirements for safety and reliability.
- Once the utility company approves the interconnection, an electrician will install a special meter called a net meter, which measures the energy produced by the solar panels and the energy consumed by the home.
- The solar system is then connected to the electrical panel of the home through a device called an inverter. The inverter converts the DC (direct current) electricity produced by the solar panels into AC (alternating current) electricity that can be used by the home.
- After the inverter is installed, the solar system is connected to the electrical panel through a breaker switch. The switch allows the homeowner to disconnect the solar system from the grid in case of an emergency or maintenance.
B. Installing net metering equipment
Net metering is a system that allows solar energy system owners to receive credits on their utility bills for any excess electricity they generate and send back to the grid. In order to connect to net metering, solar energy systems typically require a bi-directional meter that can measure both the electricity the home is drawing from the grid as well as the excess electricity being sent back to the grid. Some utilities may also require additional equipment such as an external disconnect switch or monitoring system to ensure the safety and reliability of the grid. It is important to check with your local utility company to understand their specific requirements for connecting to net metering.
C. Activating net metering
Activating net metering typically involves contacting your utility company and providing them with the necessary documentation, including a completed application for net metering and a signed interconnection agreement. Once the utility company receives and approves your application, they will install the necessary net metering equipment and activate your net metering service. At this point, you can begin receiving credits for excess energy generated by your solar system that is fed back into the grid.
Pre-Activation Process
A. Finalizing the installation
Finalizing the installation for activating a solar system involves several steps that ensure the system is ready to generate electricity and connect to the grid:
- Installation Completion: All solar panels, inverters, wiring, and mounting hardware must be installed and tested. The system must be in compliance with local building codes and regulations.
- Electrical Inspection: A licensed electrician must inspect the system to ensure that it meets the electrical code and is safe to operate. The electrician will check the wiring, grounding, and electrical components of the system.
- Utility Interconnection: The solar system must be connected to the local utility grid, and the utility company will perform an inspection before the system can be activated. The utility will check that the system is properly connected and will not pose any safety hazards.
- Net Metering: If your utility offers net metering, a special meter will be installed that can measure both the energy your home uses and the excess energy your solar system produces. This meter will allow you to receive credits for excess energy that is sent back to the grid.
B. Conducting system inspection
Typically, both the county and utility company will conduct inspections before a solar system is activated. The county will usually inspect the physical installation of the solar panels, ensuring that they are mounted properly and that all electrical components are safely and securely installed. The utility company will inspect the electrical connections between the solar panels and the grid to ensure they meet safety and performance standards, as well as to make sure the system won’t cause any issues with the grid. These inspections are important to ensure that the system is safe, reliable, and capable of producing the expected amount of energy. Once both inspections are passed, the solar system can be activated and start generating clean energy.
C. Obtaining necessary permits and approvals
Before activating a solar system, it is important to ensure that all necessary permits and approvals have been obtained from the relevant city or county agencies. These agencies may have specific requirements and regulations for solar installations, and failing to obtain the necessary permits and approvals can result in fines, legal complications, and other issues.
The specific permits and approvals required for a solar installation will vary depending on the location and the size of the system. Typically, a building permit will be required for any structural modifications or additions to the property, such as mounting the solar panels on the roof or adding an equipment rack. Electrical permits may also be necessary for connecting the solar system to the grid and for any electrical work required for the installation.
In addition to obtaining the necessary permits and approvals from the city or county, it is also important to ensure that the utility company is aware of the solar installation and that all necessary inspections and approvals have been obtained from them as well. This may include inspections of the electrical wiring and interconnection equipment to ensure that it meets safety and regulatory standards.
Activation Process
A. Scheduling the activation
A solar system typically receives permission to operate after it has passed all required inspections and obtained all necessary permits and approvals from the local government and utility company. This means that the system has been deemed safe, compliant with local regulations and codes, and capable of generating energy efficiently. Once permission to operate is granted, the solar system can be turned on and start generating electricity for the home or business. It is important to note that the process for obtaining permission to operate may vary depending on the location and specific requirements of the local government and utility company.
B. Turning on the solar panels
Once a solar system has been installed and inspected, and all necessary permits and approvals have been obtained, you can turn it on by following these general steps:
- Check that the solar system is properly connected to the utility grid and that all switches and breakers are in the “off” position.
- Turn on the inverter and allow it to go through its startup process. This can take a few minutes, during which time the inverter will be testing the system and making sure it’s ready to generate power.
- Turn on the AC disconnect switch, which allows power to flow from the solar system into your home’s electrical system.
- Turn on the circuit breakers that control the solar system. These may be located in your main electrical panel or in a separate sub-panel dedicated to the solar system.
- Check that the solar system is generating power by monitoring the inverter display or a separate monitoring system, if one is installed.
It’s important to note that the exact steps for turning on a solar system may vary depending on the specific equipment and setup of your system, as well as any local regulations or requirements. It’s always a good idea to consult with your solar installer or a qualified electrician if you’re unsure about any aspect of turning on your solar system.
C. Verifying the system performance
After a solar system has received permission to operate, it is important to verify its performance to ensure that it is operating as expected. This can be done by monitoring the energy production of the system and comparing it to the expected output based on the system’s specifications and the amount of sunlight available in the area. This information can be obtained using monitoring software and/or through physical inspections. If the system is not performing as expected, it may be necessary to troubleshoot and make necessary adjustments or repairs to ensure that the system is functioning optimally. Regular performance checks and maintenance can help ensure that the solar system continues to operate efficiently over its lifespan.